New Mexican Red Chile Sauce
When I was a kid my parents took a vacation to New Mexico, leaving my little brother and me with a sitter. I was not pleased. Besides being fiercely protective of my brother with strangers (odd, since when my parents were around, all I wanted to do was beat him up), my mother's excellent cooking had spoiled us rotten. Mrs X, we'll call her, meant well. But she was tragically unable to follow Mom's simple meal directions, and a dinnertime farce ensued. My brother would distract Mrs. X while I attempted to sneak our runny rice, burnt hot dogs, and rotten baked beans outside to the garbage can.
But there was a reward for our suffering. Mom returned with a huge ristra of New Mexican red chiles, a variety of mild chiles specific to the Southwest that become red as they ripen. On her vacation, she'd eaten red chile sauce on everything - huevos rancheros, enchiladas, roast pork - and back in California it became a base for a big pot of chili con carne, still the best I've ever eaten.
If you can find the chiles fresh, or order them online, your sauce will be bright red and wonderfully fresh tasting, but it's much easier to find them, or a Mexican equivalent, dried. Your sauce will still be tangy and delicious, but with a darker, deeper flavor and color. Try a supermarket that has Latin American produce. You should be able to find chiles packaged in cellophone bags, usually 3-6 of a kind for a dollar or two.
For just over 2 cups of sauce, you will need:
- 6-9 large dried red chiles, about 4 ounces total. (Look for New Mexican, Ancho, Pasilla, Guajillo, or use a combination. They should be about 6-8 inches long, and a deep, dark red. They should be somewhat pliable and shouldn't have any brown spots or mold. Working with chiles is a little risky, heat-wise. These varieties are generally quite mild, but every once in a awhile, you'll get a hot one. Wear rubber gloves when handling them, and don't touch your eyes! Removing the seeds and ribs will take away most of the heat.)
- Water
- 2 cloves of garlic, chopped
- 3/4 - 1 teaspoon salt
- Black pepper
- 1 tablespoon vegetable or olive oil
- Pinch of cumin, dried or fresh oregano, and white or cider vinegar, all optional
Directions:
Using rubber gloves (unless you have hands of steel and are impervious to hot peppers), snip off the stem of each chile with a pair of scissors. Now cut each one open length-wise and scrape out the seeds and as much of the ribs as you can.
In a skillet over low heat, flatten the chile pieces out and warm through on each side, just to bring out the flavor, but not to brown. This should take just a few seconds per side.
Put the warm chiles in a large saucepan and cover with water. Bring to almost boiling, then remove from heat and let sit for 10-15 minutes, until soft.
Remove the chiles from the pan (but don't discard the soaking water!) and place in a blender with the garlic, salt, pepper, and oil. Now taste the soaking water. If it tastes like a mild, weak chile tea, add three cups to the blender. If it tastes bitter, throw it away and use 3 cups of tap water instead.
Puree for 2-3 minutes until completely smooth. Now taste the sauce and adjust the seasonings. (Dried chiles are an inconsistent product, and you never know how fresh, sweet, tangy, bitter, spicy, etc. they will be until you taste them.) If you feel like the sauce is delicious and brightly flavored as is, great. If it tastes like it "needs something," first try another dash of salt and pepper. If that's not enough, try about a teaspoon of vinegar. If you still want a little punch, add about a quarter teaspoon of ground cumin and a quarter teaspoon of dried oregano. Puree again for 1 minute.
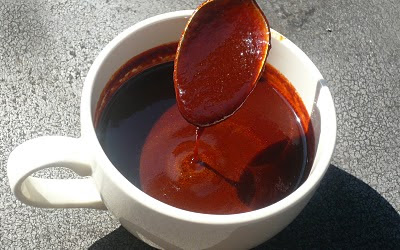
Pour through a fine sieve or strainer into a saucepan and bring to a boil over medium heat. Lower heat and simmer for 10-15 minutes, stirring occasionally. The sauce will thicken and reduce. Then taste again and adjust the seasonings a final time.
Store in glass or a throw-away plastic container (the chiles will stain plastic) in the fridge for 3-5 days, or freeze. It will taste better the next day, once the flavors have had a chance to meld. Serve with everything.