Caramel Apples
Growing up in California, I had a Northeast fantasy of fall: Harvest fairs, caramel apples, hot cider, pumpkin patches, and piles of falling leaves. We had all of those things, of course, but with temperatures often in the 80's through October, there was something missing - that brisk air that heightens your taste buds and makes everything taste better.
I always thought making caramel apples was melting down dozens of those individually wrapped Milk Maid caramel candies, but it turns out that it's nearly as easy to make your own homemade caramel, and the difference in taste is extraordinary. My roommate Randi said to me last night, "This is the best caramel I've ever had!" It's also fairly foolproof. You'll notice in the recipe that I say to make sure not to boil the cream, and to let the sugar mixture cook undisturbed, without stirring, to keep the melted sugar crystals from recrystallizing and forming a gritty texture. Well, I'm not a candy maker, and in testing these recipes, I accidentally boiled my cream AND stirred my sugar, and still ended up with great caramel. Melting sugar can be a bit finicky, and I do recommend following the directions, but if you don't, don't worry - your finished product should still turn out fine. Besides, caramel apples are supposed to be rustic. You're looking for rich, delicious taste, not perfect presentation.
One thing to keep in mind: You do need to be careful with the proportion of fat to sugar. Many caramel candy recipes call for butter, but you'll notice that this one does not. That's because if you have too much fat mixed in with the sugar, the caramel won't stick to the smooth surface of the apple. For the same reason, be careful to limit the cream to the amount listed in the recipe. I tried adding more cream, thinking that it would make the caramel softer, but it fell right off the apple.
For 8 small (2 1/2 inch diameter) caramel apples, and about 1 1/2 cups of caramel, you will need:
- 8 small, local apples, preferably crunchy, sweet, and spicy. I like a mix of red and green varieties. Use an apple with some sweetness. A granny smith will be too sour when paired with the caramel.
- Light oil or cooking spray
- 2/3 cup heavy cream (Hint: If you need a delicious caramel sauce for ice cream, use 1 cup of cream, though this won't stick to the apples because of the higher fat content.)
- 1 teaspoon vanilla extract
- 1 1/4 cups sugar
- 1/4 water
- 1/4 teaspoon kosher salt
- 2 tablespoons corn syrup or agave nectar
- 3/4 teaspoon lemon juice
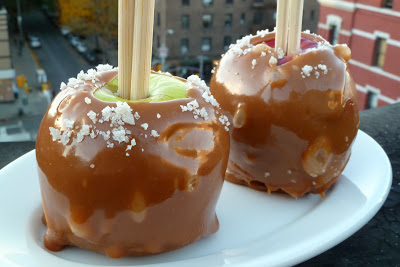
- Chopped nuts, coarse sea salt, optional
Special equipment:
Popsicle sticks, tongue depressors (available at a pharmacy), or my favorite, wooden chopsticks; wax paper; cookie sheet, tray, or large plate; two heavy saucepans, one large (3 quart or larger), one smaller.
Directions:
Wash the fruit well, and snip out the stems with scissors. Where the stems were, push your sticks about 2 inches into the apples. On a cookie sheet, spread a piece of wax or parchment paper, and grease with oil or a cooking spray. Set your apples up on the cookie sheet until ready to dip.
In a small, heavy saucepan, heat your cream and vanilla to just under boiling. (It will steam and tiny bubbles will start to appear at the edges.) Remove from heat. You don't want to boil the cream because the proteins will form a skin on the top of the cream. However, if that happens, you can remove the skin and whisk the cream to make it smooth again.
In a large heavy saucepan - please use a big saucepan here, the sugar will boil up to three times its height, and there's nothing worse than burning yourself on hot sugar or cleaning up hard sugar syrup off your range - heat the sugar, salt, water, and syrup over medium high heat. Bring to a boil, reduce heat to medium, and let cook undisturbed (don't stir it) for 5-8 minutes, until you achieve a medium amber color. How long this takes will depend on how high your heat is and what type of cookware you use. Watch it constantly. Once the sugar starts to deepen in color, it can go from amber to burnt in a minute. As a guide, think amber = flavor, brown = burnt. Remove from heat immediately as soon as you achieve a rich, golden color.
Pour the hot cream into the hot sugar mixture. It will bubble up like a witches' brew. Let it do its thing for a few seconds until the boiling subsides, then whisk vigorously to integrate and beat out the bubbles. Add the lemon juice and whisk until combined.
Let cool for a couple of minutes until the mixture has thickened a bit, how thick is up to you. You want a caramel thick enough to form a pretty golden shell on the apples, but not so thick that it's gloppy. This is quite a rich caramel, so you don't need too much. Plus, the thinner the caramel, the more apples you can cover. If your caramel become too thick to dip, simply reheat for a couple of minutes over low heat until it melts to a thinner consistency.
To dip, you want to work fast while your caramel is at the proper consistency. Holding the handle firmly, tilt your pan so that the caramel pools deeply on one side, and dip your apples into the pot one by one. Rotate the apples to cover as much surface area as you wish. (I like leaving a little space uncovered around the stick so that you can see the color of the apple.) As soon as they are completely covered in one coat, hold the apple over the pan and continue to turn as any excess drips off. This will give you a pretty, smooth finish. Resist the urge to double dip. This caramel is so rich that, believe it or not, there can be too much of a good thing. You want to taste the apple and enjoy its delicate flavor without overpowering it with too much caramel.
If you plan to dip the apples in nuts or other toppings, do this now while the caramel is still soft and warm. Fill a shallow bowl with your toppings and coat the bottom half of each apple. (I like sliced, roasted and unsalted almonds or roasted, unsalted chopped peanuts. Chopped chocolate and toasted, shredded coconut are delicious, too. I also love a simple sprinkle of coarse sea salt.) Set the apples on the wax paper to cool. They're ready to eat as soon as they're cool enough to touch. Gently lift the apples off the cookie sheet andand slowly peel the paper off to prevent ripping the soft caramel. If you plan to eat them later, wrap them in squares of greased wax paper after they have completely cooled. Do not refrigerate, or the caramel will be too stiff to eat, and you will lose your dental fillings.